

Creating the perfect loaf of bread is both an art and a science. Whether you’re a novice baker or seeking to refine your technique, this comprehensive guide will walk you through every crucial step to achieve that elusive perfect loaf. From understanding the basic chemistry to mastering the final bake, we’ll explore what makes bread truly exceptional.
Understanding the Basics of Bread Baking
Before we dive into the process, let’s understand what makes the perfect loaf possible:
- Flour (100%): The backbone of your bread. Use bread flour for its higher protein content.
- Water (65-75%): Creates steam during baking and activates gluten.
- Salt (2%): Enhances flavor and controls fermentation.
- Yeast (1-2%): Provides leavening and develops flavor.
Essential Equipment
To achieve the perfect loaf, you’ll need:
- Digital kitchen scale
- Large mixing bowl
- Dough scraper
- Proofing basket
- Dutch oven or baking stone
- Scoring blade
- Instant-read thermometer
The Step-by-Step Process to the Perfect Loaf
1. Mixing and Autolyse (30 minutes)
- Combine flour and water
- Let rest for 30 minutes
- This crucial step develops gluten structure naturally
2. Building Strength (3-4 hours)
- Add salt and yeast
- Perform stretch and folds every 30 minutes
- Look for these signs of proper development:
- Dough holds shape
- Window pane test successful
- Smooth, elastic texture
3. Bulk Fermentation (4-6 hours, 75°F/24°C)
Temperature control is crucial for the perfect loaf. Signs of proper fermentation:
- 30% volume increase
- Small bubbles visible
- Dough feels lighter and airier
4. Shaping for Success (15 minutes)
Creating the perfect loaf requires careful shaping:
- Pre-shape with gentle handling
- Rest for 15-20 minutes
- Final shape with good surface tension
- Transfer to proofing basket
5. Final Proof (12-14 hours, 38°F/3°C)
Cold proofing is key to the perfect loaf:
- Develops complex flavors
- Improves crust quality
- Makes scoring easier
6. The Final Steps to Perfection
Preheating (1 hour)
- Heat Dutch oven to 500°F/260°C
- Create steam environment
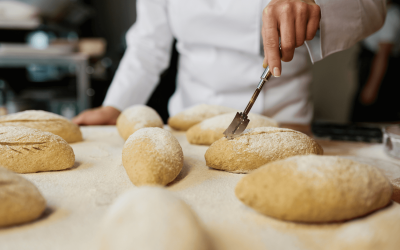
Scoring and Baking
- Score confidently with a sharp blade
- Transfer to hot Dutch oven
- Reduce temperature to 450°F/230°C
- Bake covered for 20 minutes
- Remove lid and bake for 20-25 minutes more

The Science Behind Bread Baking
One of the key concepts in bread baking is the relationship between yeast, flour, water, and salt. Yeast, a living organism, feeds on the sugars in the dough, producing carbon dioxide gas that causes the bread to rise. But did you know that yeast is incredibly sensitive to temperature? It thrives in warm environments, which is why it’s crucial to proof your yeast by dissolving it in warm water before adding it to the dough. This step ensures that the yeast is alive and active, ready to work its magic and create those beautiful air pockets in your bread.
Flour provides structure and strength, while water activates the yeast and allows gluten to develop. Gluten, a protein found in wheat flour, gives bread its elasticity and chewiness. When water is added to flour, it hydrates the gluten proteins, allowing them to form a network that traps the carbon dioxide produced by the yeast. This network of gluten strands gives the bread its structure and helps it rise. It’s like a delicate dance between the yeast and the gluten, working together to create the perfect loaf.
Salt enhances flavour and helps control the fermentation process. It not only adds a savoury taste to the bread but also regulates the activity of the yeast. Salt slows down the fermentation process, preventing the dough from rising too quickly and resulting in a more balanced flavour. It also strengthens the gluten structure, allowing the bread to hold its shape during baking.
Essential Baking Tools for the Perfect Loaf
To embark on your bread-baking journey, you’ll need a few essential tools. A reliable digital scale ensures accurate measurements, which are crucial in bread baking. Baking is a science, and precise measurements can make all the difference between a successful loaf and a disappointing one. So, investing in a good-quality scale is a wise decision.
A sturdy mixing bowl is another essential tool. Look for a bowl that is large enough to accommodate the dough as it rises. A bowl with a non-slip base will make it easier to mix and knead the dough without it sliding around on your countertop.
When it comes to working with the dough, a dough scraper is your best friend. This simple tool helps you gather and fold the dough, making the process much more manageable. It also helps you clean up any sticky residue left on your work surface.
Additionally, investing in a good-quality bread pan and a baking stone will take your bread to the next level. A bread pan provides support to the dough as it rises and bakes, ensuring a beautifully shaped loaf. A baking stone, on the other hand, helps create that coveted crunchy crust by evenly distributing heat and absorbing excess moisture from the dough. These tools, combined with your skills, will set the stage for baking success.
Choosing the Right Ingredients for Your Bread
The quality of the ingredients you use can make or break your loaf. When it comes to flour, opt for a high-protein variety like bread flour to ensure proper gluten development. High-protein flours have a higher gluten content, which results in a stronger dough and a better rise. This is especially important if you’re aiming for a chewy artisan-style bread.
Fresh yeast or active dry yeast provides reliable results. Fresh yeast has a higher moisture content and is more potent, while active dry yeast is more widely available and has a longer shelf life. Both types of yeast can be used interchangeably in most bread recipes, so choose the one that suits your preferences and availability.
If you’re feeling adventurous, consider using a natural sourdough starter. Sourdough adds depth and complexity to your bread, with its tangy flavour and unique aroma. Creating a sourdough starter requires patience and dedication, as it involves capturing wild yeast and bacteria from the environment. But once you have a thriving starter, you’ll be rewarded with bread that is truly exceptional.
Lastly, don’t overlook the importance of water. Water is the medium that brings all the ingredients together and allows the magic to happen. Consider using filtered water to eliminate potential contaminants that might interfere with the fermentation process. The quality of the water can affect the taste and texture of your bread, so it’s worth paying attention to this often-overlooked ingredient.
By choosing high-quality ingredients, understanding the science behind bread baking, and having the right tools at your disposal, you’re well on your way to baking the perfect loaf. So, roll up your sleeves, dust off your apron, and let the aroma of freshly baked bread fill your kitchen as you embark on this delicious journey.

Mastering the Art of Kneading
Kneading is a crucial step in bread baking, as it develops gluten, aligns the proteins, and gives the dough structure. Proper kneading ensures a light, airy texture and helps the dough retain gas during fermentation. Let’s explore the importance of kneading and techniques for effective kneading.
When you delve into the world of kneading, you embark on a journey that not only transforms simple ingredients into a delicious loaf of bread but also engages your senses. The rhythmic motion of kneading can be therapeutic, allowing you to connect with the dough on a tactile level. As you work the dough, you’ll notice its transformation from a shaggy mass to a smooth, elastic ball, a testament to the gluten network developing under your hands.
The Importance of Kneading in Bread Baking
Kneading promotes gluten formation and strengthens the dough. It helps incorporate air into the dough, fostering fermentation and contributing to the final texture. Additionally, kneading enhances the dough’s elasticity, making it easier to shape and handle. By devoting time to kneading, you’ll optimise the gluten network and produce a well-structured loaf.
Moreover, the act of kneading is not just about mechanical manipulation; it is a dance between flour, water, and yeast. The gluten strands align and intertwine, creating a network that traps carbon dioxide produced by the yeast during fermentation. This trapped gas is what gives bread its airy crumb and light texture, making each bite a delightful experience for your palate.
Techniques for Effective Kneading
There are various techniques for kneading dough, ranging from traditional hand-kneading to using a stand mixer or food processor. Hand-kneading allows you to feel the texture and judge when the dough is ready, while mechanical methods offer convenience and consistency. Regardless of the approach you choose, remember to apply firm, rhythmic motions and be mindful of the dough’s progress. With practice, you’ll develop a feel for the perfect level of gluten development.
As you explore different kneading techniques, you’ll discover that each method imparts its unique touch to the bread-making process. Hand-kneading may require more physical effort, but it allows you to adjust the kneading intensity based on the dough’s response. On the other hand, using a stand mixer can save time and effort, providing a more hands-off approach that yields consistent results. Whichever method you prefer, the key lies in understanding the dough’s behaviour and adapting your technique to achieve the desired outcome.
Troubleshooting Your Way to the Perfect Loaf
Common issues and solutions:
Dense Crumb
- Insufficient Fermentation: If your dough hasn’t fermented long enough, it will lack the necessary gases and structure, resulting in a dense loaf. Ensure you allow sufficient time for fermentation at the right temperature, and consider extending the fermentation period if needed.
- Under-developed Gluten: Proper gluten development is crucial for achieving the perfect loaf. If the gluten hasn’t been fully developed through kneading or stretching, the bread will not rise effectively. Be sure to knead your dough adequately until it passes the windowpane test, which indicates that the gluten is strong and well-formed.
- Too Little Hydration: Bread that doesn’t have enough moisture in the dough can lead to a dense crumb. Hydration is key for gluten formation and gas retention. Experiment with increasing the water content in your dough to create a lighter, airier texture.
Flat Loaf
- Over-proofed Dough: Allowing your dough to proof for too long can cause it to over-expand, leading to a flat loaf. Pay close attention to the proofing time and perform the poke test: if the indentation springs back slowly, it’s time to bake.
- Weak Shaping: Proper shaping is essential for developing surface tension, which helps the loaf rise correctly. Ensure that you are shaping your dough tightly enough to create a good structure. Practicing your shaping technique will help you achieve the perfect loaf consistently.
- Insufficient Surface Tension: A lack of surface tension can prevent your loaf from holding its shape during baking. When shaping, create a tight skin over the surface of the dough. This tension helps to support the loaf as it rises in the oven, leading to a better overall shape.
Gummy Interior
- Under-baked: A loaf that hasn’t been baked long enough can have a gummy texture inside. Always check for doneness by tapping the bottom of the loaf; it should sound hollow. If in doubt, use a thermometer to ensure the internal temperature reaches about 190°F (88°C) for a perfect loaf.
- Too Much Hydration: While hydration is important, too much water in the dough can lead to a gummy interior. Adjust your water content based on the flour you’re using and the humidity in your kitchen. Finding the right balance will help you achieve the perfect loaf without a gummy center.
- Cutting into Hot Bread: Slicing your bread before it has cooled completely can result in a gummy texture. Allow your loaf to cool on a wire rack for at least 30 minutes before cutting. This helps the crumb set properly and enhances the flavor and texture of the perfect loaf.
Advanced Tips for the Perfect Loaf
Temperature Control
- Monitor Dough Temperature: Keeping track of your dough temperature is crucial for achieving the perfect loaf. Use a thermometer to ensure your dough stays within the ideal range (75°F to 80°F or 24°C to 27°C) during fermentation and proofing.
- Adjust Timing Based on Environment: Factors like ambient temperature and humidity can affect your dough’s behavior. Be flexible with your timing; warmer environments may require shorter proofing times, while cooler ones may need longer.
- Use Cold Water in Summer: During hot months, using cold water when mixing your dough can help keep the temperature in check. This simple adjustment can prevent your dough from fermenting too quickly and ensure the perfect loaf every time.
Hydration Levels
- Start Lower (65%): If you’re new to bread making, begin with a hydration level around 65%. This will give you a manageable dough to work with as you learn the techniques necessary for achieving the perfect loaf.
- Increase as You Gain Experience: As you become more comfortable with dough handling and shaping, gradually increase the hydration. Higher hydration levels can yield a more open crumb and better flavor, making for an even better loaf.
- Adjust for Different Flours: Different flours absorb water differently, so be ready to adjust your hydration levels based on the type of flour you’re using. Whole wheat or specialty flours may require more water, while bread flour typically needs less.
Fermentation Indicators
- Look for Bubble Development: As your dough ferments, watch for bubbles forming on the surface and within the dough. This is a sign that fermentation is taking place, and it can indicate when your dough is ready for shaping.
- Notice Aroma Changes: Pay attention to the smell of your dough as it ferments. A pleasant, yeasty aroma signifies that the dough is developing well, while off-putting smells may indicate over-fermentation.
- Feel for Dough Strength: As the dough ferments, it will become more elastic and less sticky. Conduct a stretch test to assess the dough’s strength; it should stretch without tearing, indicating that it is ready for the next step toward the perfect loaf.
Storing Your Perfect Loaf
- Cool Completely Before Cutting: Always allow your loaf to cool fully before slicing. This step ensures that the crumb sets properly and allows for better texture and flavor when you finally cut into the perfect loaf.
- Store at Room Temperature for 2-3 Days: If you plan to enjoy your bread within a few days, store it at room temperature in a bread bag or wrapped in a cloth. This will keep it fresh without drying it out.
- Freeze for Up to 3 Months: For longer storage, you can freeze your perfect loaf. Wrap it tightly in plastic wrap and place it in a freezer bag. Thaw at room temperature when you’re ready to enjoy it again.
- Never Refrigerate Fresh Bread: Refrigerating bread can lead to staleness and a dry texture. Always opt for room temperature storage or freezing to preserve the quality of your perfect loaf.
Creating the Perfect Loaf at Different Altitudes
High Altitude (above 3,000 feet):
- Reduce Yeast Slightly: At higher altitudes, yeast can become more active due to lower air pressure. Decreasing the yeast quantity can help avoid over-rising and ensure a more balanced loaf.
- Increase Hydration: You may need to add more water to your dough because higher altitudes can cause dough to dry out more quickly. Adjusting hydration will help you achieve the perfect loaf even in challenging conditions.
- Shorter Fermentation Times: The fermentation process can be faster at high altitudes, so be prepared to shorten your fermentation times. Keep a close eye on your dough to prevent over-proofing.
Low Altitude:
- Standard Recipe Works Well: At lower altitudes, you can generally follow your standard bread recipe without significant adjustments, making it easier to achieve the perfect loaf.
- Watch Humidity Levels: Keep an eye on humidity, as it can affect your dough’s hydration needs. Adjust your water content as necessary to achieve the ideal texture and consistency for your perfect loaf.
- Adjust Hydration Accordingly: Depending on the humidity levels in your environment, you may need to tweak your hydration slightly. More humid conditions might require less water, while drier environments may need more to maintain the perfect loaf consistency.
Ready to bake your masterpiece? Grab your apron, gather your ingredients, and let’s start baking! Share your results with us in the comments below.

About the Author
Kaylene Grieve, a passionate baker and culinary educator, carries on a rich family legacy in the world of pastries and confections that began with her grandfather’s successful bakery. With over two decades of experience in business and marketing, Kaylene combines her baking heritage with digital expertise as the founder of Bake Batter & Beyond. This comprehensive baking resource reflects her mission to make the joy and science of baking accessible to all.
Dedicated to empowering both novice and experienced bakers, Kaylene’s website offers practical knowledge and tools including measurement converters, substitution guides, troubleshooting tips, and baking rescue techniques. Her special focus on the intricate world of cake making, coupled with her unique blend of family tradition and modern savvy, has established Kaylene as a trusted voice in the baking community.
0 Comments